Trees & Landscapes
Great Article… Extremely Difficult Tree Removal Solved By Employing Rescue Training Techniques!
Using Caving and Mountaineering Techniques to Transport Wood
By Norm Hall
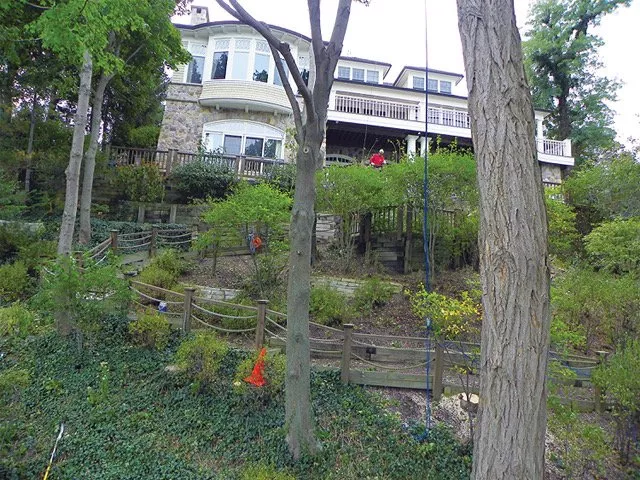
The client’s home was on a bluff overlooking Lake Michigan. They wanted a better view of the lake. Removing the trees wasn’t a big deal; however, transporting the wood out to the disposal area was a major concern. Photo courtesy of the author
Have you ever had to remove and haul the wood from trees growing on a bluff? We had such a job on Lake Michigan in a North Shore suburb of Chicago. There were approximately 15 of 30 trees to remove, ranging in diameter from 5 inches to 20 inches. Most of the removals were Norway maple (Acer platanoides), with a few black locust (Robinia psuedoacacia) mixed in. Removing the trees wasn’t a big deal; however, transporting the wood out to the disposal area was our major concern.
The only access was a 102-step switchback path going from the client’s bluestone patio to near the bottom of the bluff. Hauling the wood along this staircase would be doable, but exhausting. Was there another option?
Before the bid was given to the client, the sales arborist and I previewed the site to
determine what we thought would be the best method to transport the wood out of the bluff. There were plenty of trees to use as rigging points. We chose to use a highline system. This article will explain our setup process, the advantages and limitations of using this system and how it improved job safety and efficiency.
What led to the job
The home is located in a very affluent neighborhood on a bluff with a beautiful view of Lake Michigan. The bluestone patios on both the first and second floors overlook the lake, but the view to the lake was obscured by the numerous trees on the bluff. The client desired a greater view of Lake Michigan. A neighbor was very satisfied with some bluff work our company had completed on their property, so they referred us to this new client.
This home is in a village that requires all homeowners to obtain a permit for the removal of any tree more than 8 inches in diameter to prevent the removal of “desirable” trees. In addition, a fee is charged based on the species and diameter of the tree(s) being removed. The village forester appraised these trees for removal, and the fees totaled more than $15,000.
The work order
- Remove 15 trees and crown-thin the remaining trees on the bluff;
- Deadwood prune five trees and remove four small, declining trees in the front; and
- Haul all debris.
The job was bid for 10 days. About 85 percent of the work was on the bluff. The majority of the 15 removals were one quarter to three-quarters of the way down the bluff. To help control soil erosion, shrubs, ornamentals and ivy are planted beneath all the bluff trees. To protect the vegetation beneath, we would use rigging lines, blocks and lowering devices.
The lay of the land
This custom-built, multi-million-dollar home is the last one on a winding dead-end street and has a beautiful cobblestone drive. On one side of the home is an 80-foot-long by 4-foot-wide flagstone walkway. The flagstone walkway begins from the drive and ends at a 10-step flagstone staircase heading down to the first-floor patio. Shrubs and ornamentals are planted next to the foundation on one side of the walkway, and an arborvitae hedge screens the neighbor’s home on the other. The clearance along the walkway ranged from 4 to 6 feet. Shrubs and ivy plantings are on the opposite side of the home, leaving no access for debris removal. The flagstone walkway was our only route to haul debris.
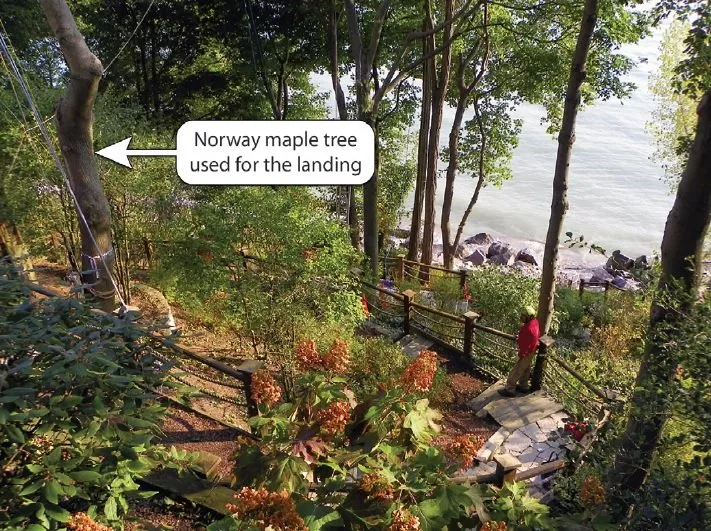
This is the anchor tree for the landing. NOTE: This tree was slated for removal, so the lowering line and throw line string were left in the tree (to the left). The lowering line was removed and replaced with throw line string at the end of the day. Photo courtesy of the author.
At the end of the flagstone staircase is a huge first-floor bluestone patio. We needed to walk approximately 40 feet across this bluestone patio to reach a 12-step staircase that leads down to a sitting/viewing area near the top of the bluff. At this point there is a 102-step switchback path, 36 inches wide, that ends at the homeowner’s private beach. The step treads vary from 12 inches to 30 inches.
This is the anchor tree for the landing. NOTE:This tree was slated for removal, so the lowering line and throw line string were left in the tree (to the left). The lowering line was removed and replaced with throw line string at the end of the day. Photo courtesy of the author. »
The pitch of the bluff varies from 40 degrees to 45 degrees. Hauling debris straight up the bluff would not only compromise the safety of our workers, but would also be very exhausting. Using the switchback path was our safest option. Hauling brush and logs from these tree removals was going to be a monumental feat. We needed to explore all of our options.
The bluff slope was about 45 degrees. There was a switchback stairway heading from the deck to the lake, 102 steps total. Most of the removal trees were a quarter to three-quarters of the way down the bluff. Photo courtesy of the author. »
Possible Options
Using a crane.Using a crane was out of the question. The radius from the set-up point on the drive to the first-floor patio was 130 feet. That’s just to the patio, not down the bluff. Renting a crane of that size would probably damage the cobblestone drive, plus be outrageously expensive for the multi-day job.
Using a controlled-speed-line/slide-line technique.We have used these techniques in the past, but the brush would most likely get hung up and/or damage the plants beneath on the way up.
A highline/trackline system.There were plenty of trees to use as rigging points for a highline system, so we explored that. The switchback path had a 7-foot by 12-foot flagstone viewing area approximately three-quarters of the way down that we could use as a brush-stacking area. There was a tall black-locust tree just behind this area that could be used as a rigging point for one of the highline anchors. Near the top of the bluff was a Norway maple slated for removal. We could use this tree as the other anchor, once the trees limbs were removed. Using the above two trees as anchors would keep the brush 30 to 35 feet above grade and the angle of the highline at 10 degrees downward. Since the angle of the highline was pitched down, we needed to incorporate a haul system to get the brush and logs uphill to the Norway maple. This would mean using a rigging plate. We also had to figure out a way to haul the brush and logs up the 30- to 35- foot height of the highline.
The brush staging area at the bottom. Photo courtesy of the author.
Caving and mountaineering rescue techniques.I have been reading caving and mountaineering rescue books for 15 years. Mountain rescuers can build a rope system to hoist an injured climber from rock faces to the top of the cliff for patient transport.
Using both the highline/trackline and mountaineering rescue techniques, we could build such a system to transport wood up the bluff. I have a half-inch by 200-foot static line that I use for “slide lining.” About 20 years ago, I made a steel parallelogram-shaped plate from three-quarter-inch steel. The original purpose was to use it for slide lining. I drilled seven five-eighths-inch holes to accommodate 11mm steel locking carabiners (three on the top, three on the bottom and one on the uphill side). The uphill side hole was used as the control/haul-back line. The steel plate weighs 5 pounds. I keep three half-inch screw-pin shackles on this plate to use as links for the rescue pulleys. I like using screw-pin shackles to eliminate the possibility of a carabiner accidently opening. My thought was to use the steel plate as the transport carriage. All the other hardware and software, which included rescue pulleys, steel pear links and various ropes, were readily available.
The setup was going to be a little complex and there would be extremely high forces on the two anchor trees, which we had to be cognizant of. The setup would be as follows.
The half-inch by 200-foot static line would be anchored between the two trees.
A trolley system consisting of the rigging plate, connecting links and pulleys would be set up on the highline.
Haul-back/pull lines would be anchored to the side of the rigging plate.
A reeving system would be used that was able to go up and down in a controlled manner, using a tending micro pulley attached to the bottom of the rigging plate.
Performing the job
To eliminate any confusion, we sketched a diagram of the system so everyone was on the same page. Now we were ready to set up the highline.
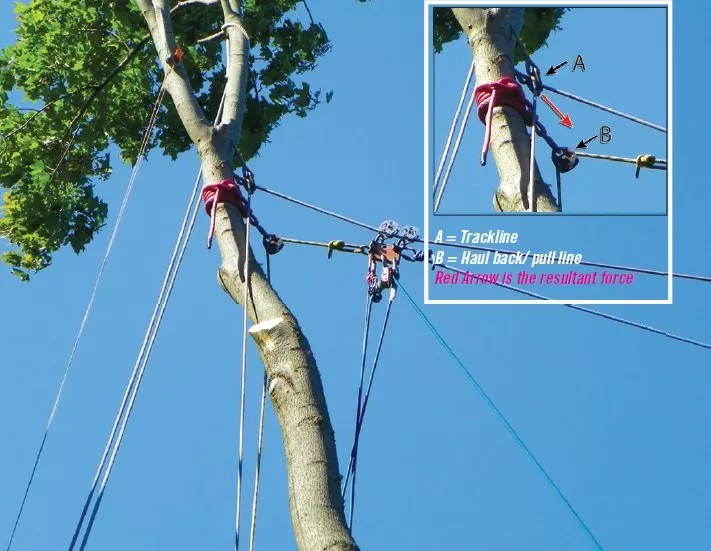
The Norway maple tree near the top of the bluff was limbed up to the highline anchor point. We left the top of the tree to help with dampening the forces. The rigging friction saver, highline and haul system were installed. The black-locust tree near the bottom was without any branch unions where we wanted to anchor the highline and haul system, so it had to be climbed to set the rigging. Otherwise, we could have set this system using a throw-line string.
Due to the extremely high forces involved on the two anchor trees, we chose to thread the trackline through rigging friction savers and anchor them to Port-A-Wraps near the base of each tree. This setup served a dual purpose: (1) the resultant forces generated were directed on an angle, instead of horizontally; and, (2) the trackline rope tension was easily adjusted from the ground.
Speaking of the ropes tension, the static rope was not taut. We left a little slack to reduce the vector forces.
NOTE: Had we tensioned the static rope and not left any slack (180 degrees), the force on the anchor points would have been extremely high. Keeping the rope at a 175-degree angle with very little slack can generate vector forces up to 11 times the load. While in the two trees, we also installed the pull/haul-back pulleys, using spliced-eye slings, steel locking carabiners and rescue pulleys.
The next step was to install the rigging plate assembly onto the highline. Using two of the top holes, we anchored two CMI RP104 rescue pulleys to two half-inch screw-pin shackles. Using two pulleys helped spread the weight on the highline and prevented the rigging plate from rotating. The pins on the screw-pin shackles were torqued tight. Using the one side hole, we anchored one of the haul lines to the third screw-pin shackle. Since there wasn’t a hole on the opposite side, we chose to use a 10mm pear link connected to one of the top screw pin shackles, then tied the rope to that. Now we had a trolley system that could be moved back and forth between the two anchor trees.
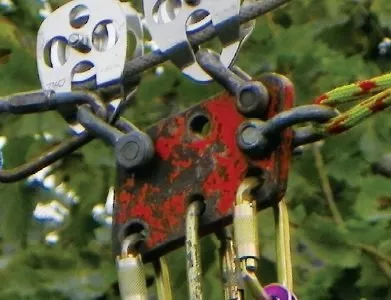
The heart of the system, “The Carriage,” a piece of 3/4-inch steel
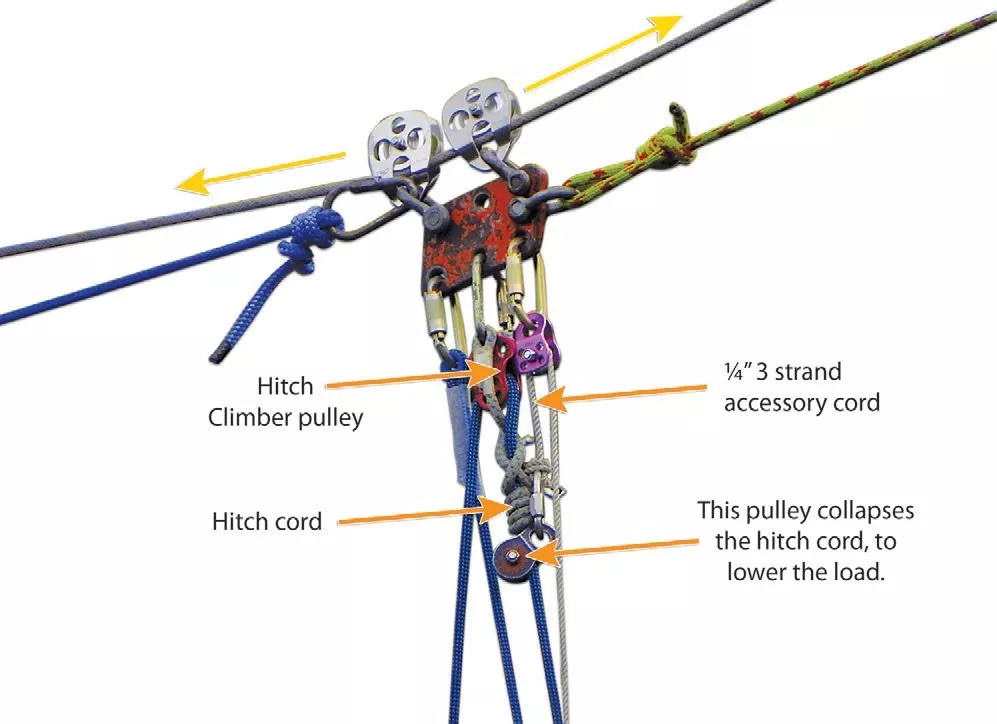
The reeving system was rigged with a 2-to-1 mechanical-advantage system to a “hitch-climber” pulley at the top. A hitch cord tied with a “VT” held the load once hoisted. Photo courtesy of the author.
Our last step was to install the haul system. We utilized all three holes on the bottom of the plate. This system was going to be very similar to an upside-down DdRT (doubled-rope) climbing system utilizing a PulleySaver. Using it in this configuration would give us a 2-to-1 mechanical advantage on the haul/lowering system.
We used a half-inch by 150-foot All Gear Blue Finish Line (static rope) as the haul rope. This rope had a sewn eye on one end, which was anchored to an end hole using a steel locking carabiner. The middle hole had a DMM Hitch climber pulley anchored to it using another steel locking carabiner. The Blue Finish Line was threaded through the Hitch Climber pulley, leaving a bight of rope for a CMI RP104 pulley that would be used for the “haul system.”
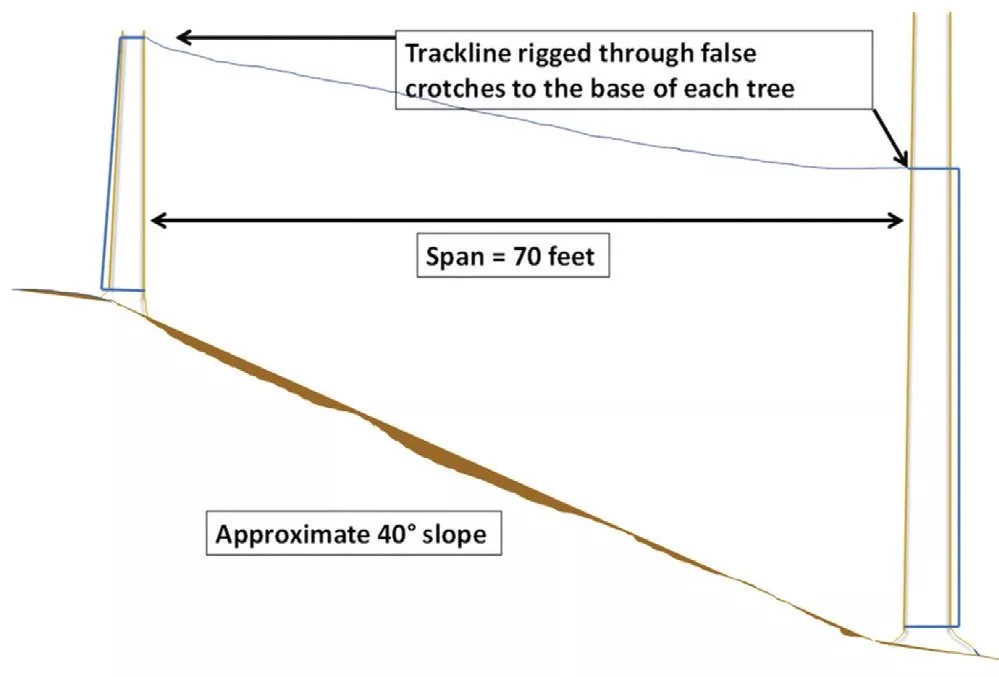
An illustration of the slope and trackline setup. Photo courtesy of the author.
A hitch cord was anchored to this rope (using a VT, or Valdotain Tresse knot) to capture and hold the rope once it was loaded. The other end hole had a micro pulley anchored to it using another steel locking carabiner. This micro pulley would hold a quarter-inch rope that would be used to collapse the VT and lower the load.
The CMI RP104-pulley haul system had a steel carabiner on it, which had a 3/8- inch fixed loop connected to it for hauling logs. When we hauled the brush, we switched to an eye-and-eye choker.
With the system installed, we were ready to transport the loads.
We positioned two workers at the brush/log staging area (#1, #2). These workers (#1, #2) put the eye-and-eye choker on the brush, then hoisted it up to the rigging plate. Another worker (#3) was up the hill at the base of the Norway maple. Once the load was hoisted to the rigging plate, this worker (#3) controlled the uphill transport of the load. Once the load was transported uphill, another worker (#4) was stationed near the Norway maple. He (#4) pulled on the quarter-inch rope to collapse the hitch in order to control-lower the load to his co-worker (#3) at the base of the Norway maple. The two workers (#1, #2) at the staging area would stack the brush and choke it to connect it to the RP104 pulley.
To ensure everyone’s safety, we limited the loads to 200 pounds, which was about the maximum one worker was able to continually hoist. Keep in mind, we rigged a 2-to-1 mechanical-advantage system which was on two pulleys with bronze, oiled bushings. This resulted in some efficiency loss due to the bushings. After a couple of complete load/hoist/haul cycles, the crew was elated at how easy and efficient the system was to use. All the wood from every tree removed on the bluff was transported using this trackline system. At the completion of the job, removing the trackline system was much easier than the setup.
Summary/End result
Although we had never used a trackline system before, we were able to save the company money by putting it together using the ropes and hardware from our inventory. The trackline system took a couple of hours to set up, but at the conclusion of the job it proved to be very useful and worthwhile, considering the amount of time and energy that was saved hauling the wood up the 102 steps. This trackline system also proved to be a very safe method to complete the job. The client and our company were very pleased with the end result, and I would highly recommend using this method for any bluff-type work.
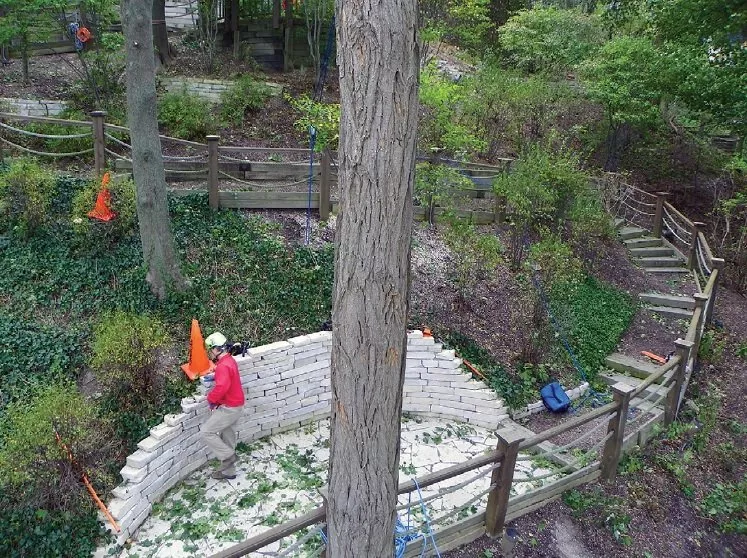
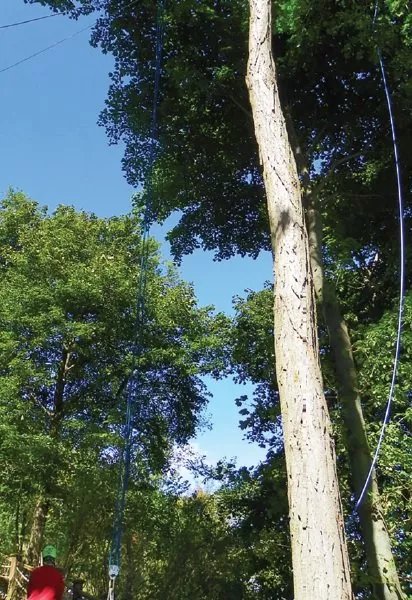 This the black locust we used for the lower anchor. The trackline is 30-35 feet up. The hoisting pulley is just to the right of the worker. Photo courtesy of the author.
Norm Hall is an ISA Certified Arborist, a Certified Tree Worker Climber Specialist and a lead instructor for the Illinois Arborist Association Advanced Training Program. He has been in the tree care industry for more than 45 years. After several years with Kinnucan Tree Expert & Landscaping Co., an accredited, 41-year TCIA member based in Lake Bluff, Illinois, he recently took a position as a splicer and trainer with All Gear Inc., a 17- year TCIA Associate Member based in Northbrook, Ill.
Norm Hall, Leads a Present Day Climbing Level I Course

Norm Hall, our Tree Care Operations Supervisor, lead a Present Day Climbing Level I course at Triangle Park, Lake Forest, IL. This 2-day class was designed to show and demonstrate the latest climbing tools and techniques. As a “hands-on” class, all participants assessed trees for risk; installed a climbing line using a Double Rope Technique; ascended into the tree to make several pruning cuts, while suspended from their work, positioning a rope and harness.
This Illinois Arborist Association sponsored class is a part of the required IAA Advanced Training Program Module, designed to further knowledge in subjects such as Safe Work Practices, climbing and rigging techniques, and tree felling and tree ornamental pruning.
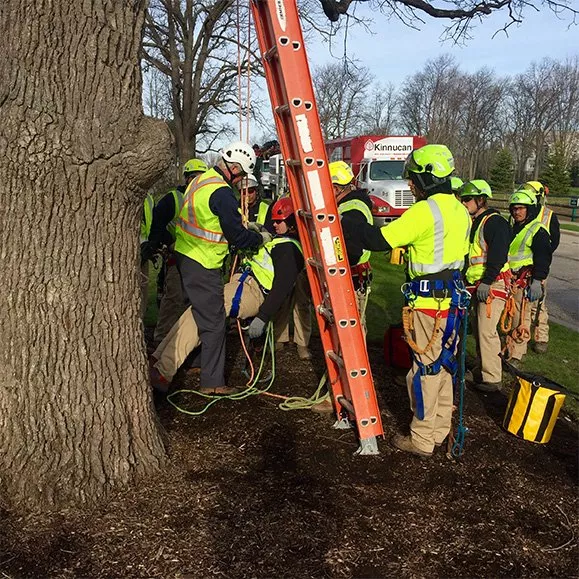
Kinnucan Instructed an Arborist Rescue Clinic

On May 9th and 10th, Norm Hall, our Tree Care Operations Supervisor helped instruct fire & rescue personnel in arborist rescue. When a fire/rescue team is dispatched to rescue an injured climber aloft, and the fire/rescue team can’t get to the injured climber using their ladder truck, it takes an average of 2.5 to 3 hours to get the climber to the ground. The reason why is because they can’t access the arborist in the tree, using the equipment issued to them. A very high percentage of their rescues are from the top, where they can tie off to an anchor and lower the rescuer to the patient. This training familiarized the fire/rescue personnel with arborist throwline and a throw weight to set a rope into the tree, to facilitate a rescue. A trained arborist can get the climber to the ground in 15-20 minutes.

Kinnucan Tree Care Division Practiced a “Tree Rescue”
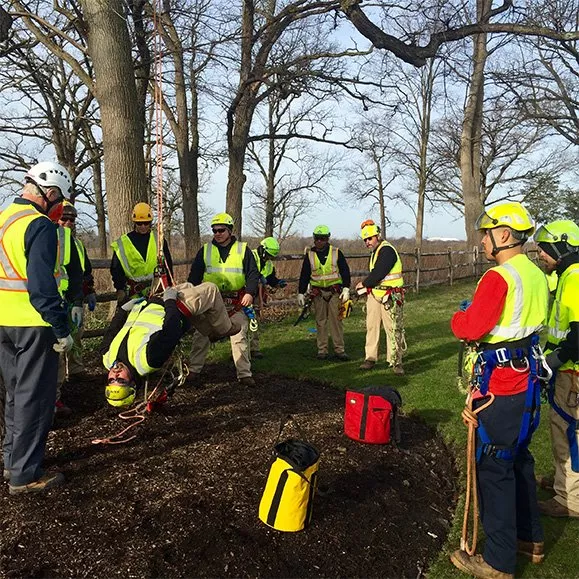
On April 11, 2016, the Kinnucan Tree Care Division practiced a “tree rescue,” known to arborists as “aerial rescue.” Every climber in the Tree Care Division performed a “mock” rescue. There is a specific protocol to follow when an injured climber needs help getting to the ground when aloft. This training will greatly reduce the time it takes to bring the injured climber safely to the ground. Statistics have shown that when a Fire/Rescue Team is dispatched for a tree rescue, the average rescue time is 2.5 hours. When a tree care company practices a tree rescue, that time is reduced to 15 minutes.

Discover the Latest Landscaping Trends
 As we start to think about spring and hopefully warmer weather, now is a great time to think about your landscape and any changes or additions you’ve been dreaming about. If you are looking to freshen up your patio, lawn or garden with some updated landscaping, make sure you take a look at one of these current trends.
Current Landscaping Trends:
- Simplicity
- Fire accents
- Outdoor rooms
- Concrete pavement
- Edible and Rain Gardens
- Water features
- Accent lighting
Less is More
In the years following the recession, homeowners have moved away from over-the-top landscapes to investments in higher quality, more natural materials. Low-maintenance grasses are especially popular since they require less time and money and cut back on the use of fertilizers and weed killers.
Fan the Flame
Homeowners are turning up the heat on their landscaping designs with dramatic fire accents. Whether it’s a fire pit, an outdoor fireplace or full-blown outdoor kitchen, a fiery accent can add a cozy, romantic feel to any outdoor area.
Inside Out
Bring the game outside! By mounting a TV outdoors, you can enjoy the day while you watch your favorite teams. Just make sure your TV is rated for outdoor use, and installed properly by a professional. And, as the technology behind waterproof and fade-resistant outdoor fabrics improves, full outdoor rooms are becoming increasingly popular. Homeowners are furnishing their patios with permanent living spaces complete with comfortable furniture and stylish designs.
Pave the Way
With continued improvements in the quality of paving, concrete is becoming a trendy, affordable landscaping alternative to stone and brick. Combined with the right pattern and design, pavement can be a complementary asset to any yard, as well as environmentally advantageous.
Vegging Out
While vegetable gardens have always been around, edible yards are experiencing a never-before-seen boom in popularity. Growing everything from fruit trees and tomato vines to berry bushes and medicinal plants, homeowners are adding a variety of colorful, useful plants to every area of their yards. Have you heard of a Rain Garden? This is a wonderful way to enjoy the beauty of a garden while making the best use of rain runoff.
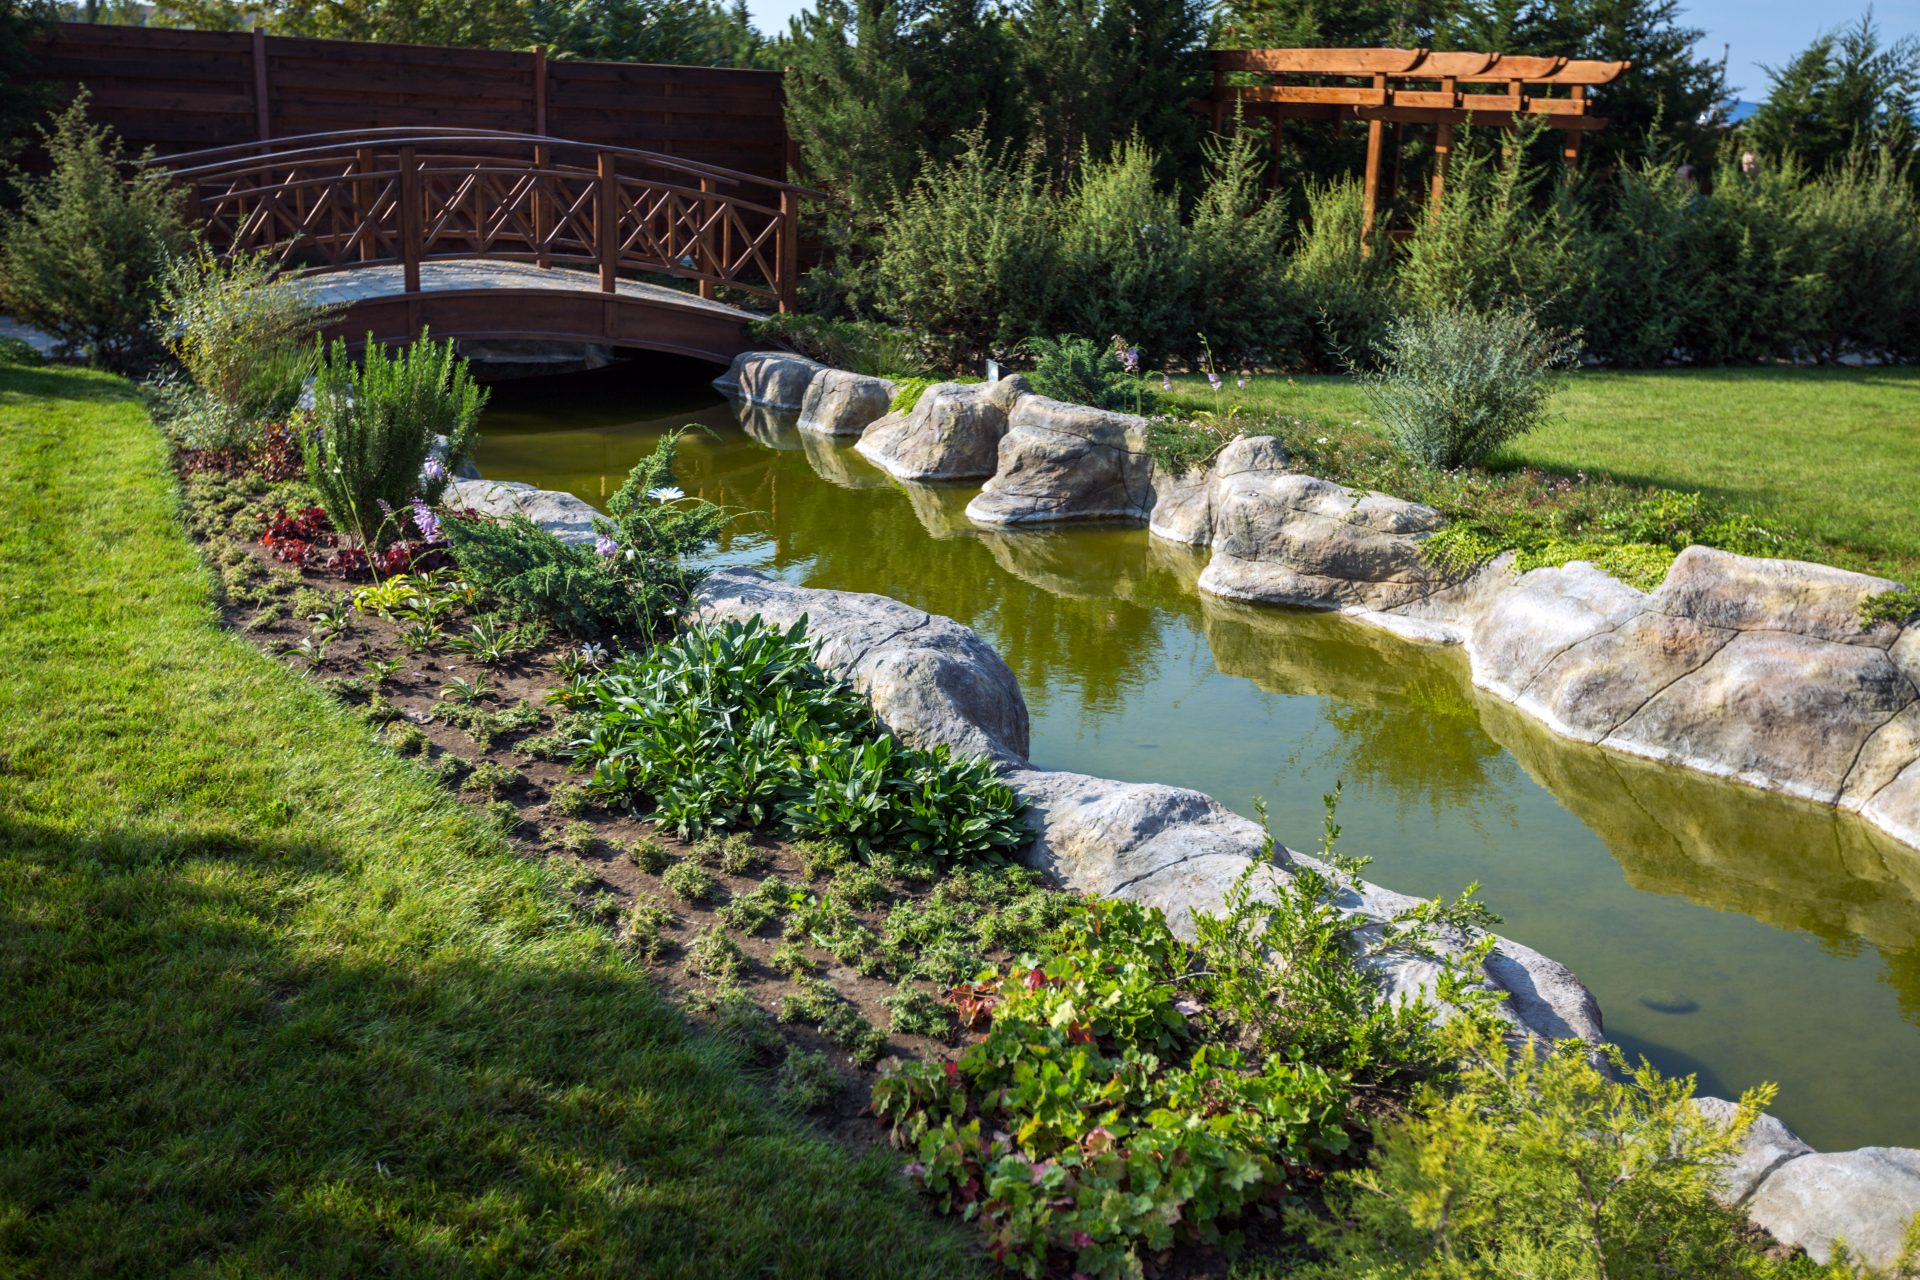
Testing the Waters
Water features are dominating landscaping designs, adding a natural, fresh feel to outdoor areas. From simple birdbaths to bubblers, to elaborate, high-end water walls, homeowners are truly going crazy for water landscaping.
Lights on!
With LED lighting becoming more affordable and much more aesthetically pleasing, we are seeing outdoor patio lighting, particularly strings of lights across such places as pergolas and gazebos. Up-lighting, “Moonlighting” (high lighting placed up in trees to shine down on patios), and Down-lighting from hardscape (hidden by day, lights up at night) are trending, along with the ability to control from your iphone and/or ipad.
NORMAN S. HALL JOINS KINNUCAN TREE EXPERTS & LANDSCAPING COMPANY
Norm started working in the tree care industry in 1969 during his summer break. As a 2nd generation arborist, Norm has been around tree care all of his life. He enjoyed working with his father at an early age and developed a passion for plant life. Like most arborists, Norm started working as a groundsperson for the same company as his father. His experience includes rope and harness climbing, aerial lift operation, technical tree rigging, chainsaw operation, truck mounted crane assisted removals, applying pesticides, fertilization, cabling and bracing, and lightning protection installation. Norm has been an ISA (International Society of Arboriculture) Certified Arborist since April 1996 and an ISA Certified Tree Worker “Climber Specialist” since April 2002, when the program originated. Norm is an ISA, Illinois Chapter proctor for the Certified Tree Worker program.
Additionally, Norm has served on the ANSI (American National Standards Institute) Z133 Committee, a group of USA arborists who are committed to safety for the tree care industry. He is also an Illinois Arborist Association (IAA) past president, and is on the Illinois Arborist Association “Advanced Qualification” program as a lead instructor in the “Tree Work” domain.
Norm has received 3 “Special Recognition” awards from the Illinois Arborist Association, and is an “Honorary Life Member” of that organization.
In his free time, Norm enjoys boating, fishing, water sports, hiking, and spending time with his wife in their “empty nest” home.
BUR OAK BLIGHT
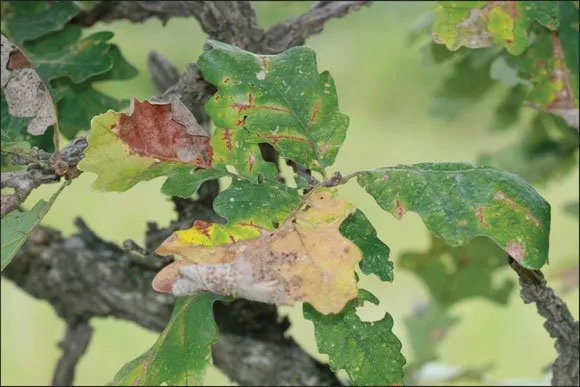
A serious leaf blight disease on bur oak has been recognized in several Midwestern States, including Illinois. Researchers in Iowa confirmed that this disease is caused by a new, and yet unnamed, species of Tubakia. The disease was named bur oak blight, or BOB for short.
BOB occurs only on bur oaks, primarily on naturally established trees, and especially on mature trees on upland sites that appear to be remnants of savannah forests.
Leaf symptoms typically first appear in late July or August. Infected leaves develop purple-brown lesions along the midvein and major lateral veins on the underside of leaves. Large, wedge-shaped areas of chlorosis and necrosis develop on the leaf blade, and major leaf mortality may occur. The symptoms of wilting and leaf scorch resemble, and have been confused with, symptoms induced by oak wilt. A unique feature of BOB is that some of the killed leaves remain on the tree during the winter (healthy bur oak trees shed all of their leaves in the fall)
Over time, severely affected trees may die. Boosting tree vigor may prolong the life of affected trees and ward off invasion by secondary pests. In preliminary studies, injections of the fungicide propiconazole in late May or early June (prior to leaf symptoms) have reduced symptom development in the fall and the following year. For more information of Bur Oak Wilt, feel free to contact one of the Kinnucan Arborists.
2014 Trends for Decking the Landscaping Halls with Boughs of Lighting
Black Friday is not just a big shopping day, it’s also a day to deck the halls, inside and out. This holiday season trend will be adding a bit more color to holiday landscaping.
Although Christmas is a holiday filled with traditions, your lighting and décor does not need to be old fashioned. Here are a few lighting trends to watch for during this holiday decorating season:
Adding color:
Warm, white lights still are the most popular outdoor decor, but a lot of people are asking for more colors in their holiday design, trending away from the conservative traditional style. Multi-colored, red, blue, green and yellow lights will be illuminating holiday cheer in many neighborhoods this season. Mixing and alternating colors will reveal a signature look.
LEDs will be Lighting the Path
LEDs are becoming more and more popular. Although they initially cost more, they last longer and only use 15% of the electricity of traditional lights. Another perk is that they do not break as easily. The difference between LED and traditional incandescent is nearly undetectable unless you have them sitting side by side in front of you. The color in LEDs has been perfected with a pop and glow that out shines the hue of incandescent lighting.
Animation of Christmas:
Christmas light and music shows are beginning to appear in neighborhoods across the country with lights flashing to music. The traditional animated decorations of reindeers grazing, snowmen waving and lighted blow-up lawn ornaments are still in season.
Natural Alternatives:
Lighted greenery give light designs a natural look. Wrap banisters with lighted garland or hang lighted wreaths on doors or in windows. Tree and shrub wrapping also provide a natural and stunning look that will surely stop traffic.
This season’s trend is leaning towards clean, crisp and traditional with a splash of color.
Kinnucan Tree Experts and Landscape Company provides homeowners, businesses and municipalities with beautiful, festive and unique holiday landscapes. We have the experience, knowledge, equipment and trained personnel to insure the finest in holiday decorations. We offer:
• Traditional and Unique Designs
• LED and Incandescent Lighting
• High-quality Fresh Garlands and Wreaths
• Winter Interest Pots
• Installation, Removal and Storage
While you are shopping for the perfect gifts, let Kinnucan deck your halls with Christmas Tradition. Contact us today for a free quote and consultation.
Your Dream Landscape Design Is Just A Call Away

Do you fantasize of a beautiful yard “as seen on TV” or in a magazine? Not knowing what will grow where, what to fertilize, prune, cut, and when can be very expensive mistakes that are easily made when we leap into our picture perfect vision. Calling in the experts will not only save you money in the long run, you will also be spared the disappointment and frustration of watching your hard work and dream wither away.
Kinnucan Tree Experts and Landscape Company specializes in making your landscape dreams come true; from landscape design and construction, maintenance, plant health, lawn care to fertilization. You bring your vision to us, and we will work closely with you to keep your vision in bloom for years to come. Our certified expert team offers over 40 years’ experience in making landscape dreams a reality while saving our customers’ time and money. Call Kinnucan today: 847-234-5327. Your dream landscape is ready to bloom.
Weather the Storm with Kinnucan Tree Expert and Landscape Company
‘Tis the season of unpredictable weather. The ever changing weather often comes with little or no warning. Severe storms, high winds, flooding, tornadoes and the occasional freak hail storm can destroy property and even cause loss of human life. To complicate matters more, the aftermath can be even more dangerous if not handled with precaution and expertise.
Being proactive and planning for emergencies is vital for safety and survival. Kinnucan Tree Experts and Landscape Company can guide you on how to weather the storm safely and we are available to pick up the pieces after the storm, regardless of day or time. Our expert emergency team is available 24/7. We are proud to announce we have been voted “The Best of the Best” in Lake Bluff and Lake Forest after the devastating storm that took us by surprise in June.
Fallen trees can cause all sorts of chaos. Blocking roadways, knocking out power lines, severe property damage to homes, commercial buildings, automobiles, you name it. No fixed, or even moving, object is safe when a tree is coming down with force. It is important to have an expert remove a fallen tree to avoid the untrained unforeseen dangers that could result and cause even more damage; or even severe injuries and possible death.
Tips on how to Weather the Storm Safely:
Having a safe plan to protect your family in the event of dangerous weather and emergency situations is extremely important.
- Have a disaster supply kit readily available.
- Have a plan:
- Designate and know where your “safe place” is.
- A meeting spot if you were to be separated.
- Know who your out of town contact is and how to contact them.
- Know where your disaster supply kit is located.
- Take pictures or videos of your home, its contents for insurance purposes. Keep at a friend’s home.
- Know where your gas and water shut-off valves are located.
- Have cash on hand. (power outages means no ATM or Credit Cards)
- Fill your car up
- Include pets in your plan. (This includes making sure their vaccinations are up-to-date).
- Listen to emergency announcements and follow directions. THIS IS KEY!!!
Tips for After the Storm:
- Contact your out-of-town person and other family members to let them know you are okay.
- Continue to listen to emergency announcements:
- Wait for the “all clear” before returning home or leaving your “safe room”.
- Access damages in your home.
- Contact your insurance provider to report damages.
- Clean spilled chemicals – medicines, bleaches, gasoline and any other flammable liquids.
- Again, include your pets: Confine them during clean-up; use a leash when re-orienting them to the new environment of the home. If you cannot locate your pet after the disaster – contact your local animal control office immediately.
- Be neighborly; make sure your neighbors are okay – especially the elderly and disabled.
- Repair and block access to anything in your home that is damaged and can be dangerous.
- Stay away from downed power lines.
- CONTACT AN EXPERT to remove trees and large debris.
Following a few simple steps and preparing for the worst is the safest measure. As the old saying goes, “it is better to be safe than sorry”. We are here to help you prepare for the worse and will get you back to the best safely. Call our expert team if you have any questions.